The goodThe good: Excellent task quality; decent task speeds, particularly photo printing; PictBridge port.
The badThe bad: No memory card slots; task feature sets arent as fleshed out as the competitions.
The bottom lineThe bottom line: If youre looking for the best print and scan quality from a budget all-in-one, the Canon Pixma MP210 is the one for you. Other models, however, offer more substantial feature sets.
Specifications: Office Machine Functions: Copier , Printer , Scanner ; Printer type: Multifunction printer ; Printing Technology: Ink-jet ; See full specs
Showing posts with label printer. Show all posts
Showing posts with label printer. Show all posts
Thursday, May 23, 2013
Wednesday, May 22, 2013
Canon printer i850 i950 S600
Dear all reseters
Start with the printer OFF
1. Hold down RESUME and then hold down POWER
2. release RESUME
3. press RESUME twice, then release POWER
4. Let green light blink until printer is done futzing Select function with RESUME press POWER to execute: presses - light color - function
Number of presses - light color - function
0 presses - green - Test print (or exit service mode on i960)
1 press - orange - EEPROM info print (plus grid nozzle diagnostic on i960)
2 presses - green - EEPROM initialize
3 presses - orange - Reset waste ink counter
Start with the printer OFF
1. Hold down RESUME and then hold down POWER
2. release RESUME
3. press RESUME twice, then release POWER
4. Let green light blink until printer is done futzing Select function with RESUME press POWER to execute: presses - light color - function
Number of presses - light color - function
0 presses - green - Test print (or exit service mode on i960)
1 press - orange - EEPROM info print (plus grid nozzle diagnostic on i960)
2 presses - green - EEPROM initialize
3 presses - orange - Reset waste ink counter

Sunday, May 19, 2013
Printer HP
Dear all reseters
To clear the Maintenance Service Message from the LCD display:
Printer
HP IIISi Printers:
To clear the Maintenance Service Message from the LCD display:
Printer
HP IIISi Printers:
- Press ONLINE until the light goes off
- Hold down MENU until PCL CONFIG MENU appears
- Press the MENU key until SERVICE MSG=ON* appears
- Press the + or - key to change display to SERVICE MSG=OFF
- Press ENTER/RESET MENU key to turn message off, the * should appear, then press ONLINE
Printer
HP 4Si Printers:
- Press ONLINE until the light goes off
- Press MENU until CONFIG MENU appears
- Press the ITEM key until SERVICE MSG=ON* appears
- Press the + or - key to change display to SERVICE MSG=OFF
- Press the ENTER key to turn message off, the * should appear, then press ONLINE
Printer HP 5Si:
- Press MENU key 4 times for CONFIG MENU
- Press ITEM to display SERVICE MESSAGE=OFF
- Press ENTER
- Press ONLINE
Printer HP 4000/4050/4100/5000 Printers:
- Turn the printer off
- Hold down the left side of the ITEM and VALUE +/- keys, turn the printer on and wait until RESET MAINTENANCE COUNT is displayed and then release the keys
Printer HP 4500/4550 Printers:
- Turn the printer off
- Hold down the CANCEL JOB and SELECT keys and turn the printer on, then wait until the display goes blank and the three LEDs come on
- Press the right side of the MENU key, then press the SELECT key
- You will enter SERVICE MODE after the normal test completes
- Press the ITEM key until the FUSER MAINTENANCE COUNT appears
- Press VALUE +/- to change to zero
- Press SELECT to save
- Press GO; the printer should return to READY
Printer HP 8000/8100/8150 Printers:
- Press the MENU button until the display reads CONFIGURATION MENU
- Press the ITEM button until the display reads SERVICE MESSAGE = ON/OFF
- Select OFF*
- Press SELECT to save
- Turn printer off
- Hold the VALUE MINUS and ITEM MINUS buttons while turning the printer back on Hold buttons down until display reads RESET MAINT/COUNTand then release both buttons
Printer HP 9000 Printers:
- Turn the printer off
- Press and hold the CHECK key
- Power on the printer
- Release the CHECK key after all three lights come on The display should read SELECT LANGUAGE.
- Press the up arrow until MAINTENANCE KIT is displayed, then press the CHECK key again and the maintenance kit count has been reset
HP Color LaserJet 4500/4550 Printers (TRANSFER KIT RESET):
- Press the MENU button until the RESETS MENU is displayed
- Press the ITEM button until TRANSFER KIT SELECT IF DONE is displayed
- Press the SELECT button
- Press the GO button to return to READY
HP Color LaserJet 4600 Printer (IMAGE TRANSFER KIT (ETB) RESET):
- After Maintenance is performed, the display should read NEW TRANSFER KIT =
- Press the down arrow to highlight YES, then press the CHECK button to reset Or enter CONFIGURE DEVICE in menus, choose RESETS then RESET SUPPLIES, choose NEW TRANSFER KIT and select
HP Color LaserJet 4600 Printer (FUSER KIT RESET):
- After Maintenance is performed, the display should read NEW FUSER KIT =
- Press the down arrow to highlight YES, then press the CHECK button to reset Or enter CONFIGURE DEVICE in menus, choose RESETS then RESET SUPPLIES, choose NEW FUSER KIT and select
HP Color LaserJet 8500/8550 Printers (TRANSFER KIT RESET):
- Press the MENU button until the RESETS MENU is displayed
- Press the ITEM button until RESET TRANSFER LIFE COUNT is displayed
- Press the SELECT button to reset, then GO to return to READY
HP Color LaserJet 8500/8550 Printers (FUSER KIT RESET):
- Press the MENU button until the RESETS MENU is displayed
- Press the ITEM buton until RESET FUSER LIFE COUNT is displayed
- Press the SELECT button to reset
Saturday, May 18, 2013
Epson Stylus Pro 7900 Printer

Epson has launched two new additions to its Stylus Pro inkjet printer range, the SP7700 and SP9700. At 24in and 44in respectively, the Epson Stylus Pro 7700 and 9700 are packed with the latest Epson technologies that add precision, reliability and productivity to a wide range of professional printing applications.
Epson technology is renowned for delivering fast, efficient printing. The Epson Stylus Pro 7700 and 9700 are designed to produce faster output without compromising print quality, by using advanced compression and decompression technologies that speed up data during printing. The printers feature the latest Epson MicroPiezo TFP print head, which is optimised to work with a five colour ink set, a subset of Epson UltraChrome HDR Ink incorporating cyan, vivid magenta, yellow, photo black and matte black. The print head delivers perfectly accurate dots with virtually no misting or satellites. Perfect smoothness and detail is down to Epson Variable-Size Droplet technology (VSDT), which can produce droplets as small as 3.5 picolitres.
The Epson Stylus Pro 7700 and 9700 produce prints with even more impact thanks to the Vivid Magenta Technology. Vivid Magenta gives a wider colour gamut, which in turn provides enhanced colour accuracy. This is particularly noticeable for blues, magentas, reds and oranges, giving prints a more natural and life-like appearance. The ink set also includes both Matte and Photo black inks, which maximises quality on any given media. The printer automatically selects the optimum black ink to match the media, which adds convenience and productivity to the printing process and reduces cost.
Prints from the Epson Stylus Pro 7700 and 9700 are highly light-fast and will retain their colour and quality for longer, wherever they are used. The specifically formatted pigment inks are water-resistant and have excellent colour stability, for long-lasting prints which are dry and stable very shortly after emerging from the printer.
There is a range of features of the Epson Stylus Pro 7700 and 9700 which makes the printing process as easy and as flexible as possible. Fast network connection, clear control and straightforward operation and maintenance are built in. The high-visibility 320x200 pixel control panel screen shows all aspects of the printer from ink levels and quick cleaning to paper cutting and job cancellation. Barcode printing is a way to keep track of media during changes and can eliminate misprints due to lack of media. The new spindle-less flange system makes changing roll paper easier and takes up less space. It handles a wide variety media types, sizes and tensions and the new rotary paper cutter is more durable, cuts smoothly and cleanly in seconds, so there is no need for manual cutting.
Intelligent software helps users get the most out of the Epson Stylus Pro 7700 and 9700 by keeping track of all aspects of printing, streamlining the workflow and enhancing creativity. The new intuitive printer driver is easy to use and can be customised for different levels of information and print and media settings. These printers include the drivers to support the AutoCad HDI interface for high speed and precision accuracy.
Epson’s Layout Manager, a new function within the printer driver, enables the easy importation and layout of data created in various applications. Functions such as Move, Enlarge/Reduce, Rotate and Fit-to-Roll simplify workflow and reduce waste.
Epson Stylus Pro 7700 and 9700 key features summary:
· Advanced 10-channel Epson MicroPiezo™ print head
· 5-colour Epson UltraChrome HDR (subset) ink technology with Vivid Magenta Technology – Cyan, Vivid Magenta, Yellow, Matte Black and Photo Black
· 1440x1440 dpi resolution with Epson Variable-sized Droplet technology
· Handles roll or cut sheet media up to 24” for SP7700 and 44” for SP9700 and 1.5mm thick
· New flange roll holder for fast and easy media changeover
· 2.5” colour LCD control panel with white backlight
Printer Epson R230X resetter
Easy method to resset Printer Epson R230X
Download SSC Service Utility software. Click here to get the software.
The steps:
1. Make sure printer in the living conditions and are connected with a computer
(driver printer sudah terinstall)
2. Instal SSC Service Utility and run the program
3. Setting configuration printer model.Choose Epson Stylus Photo R230. then close the main window.
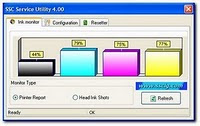
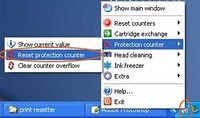
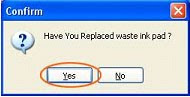
4.At the bottom right taskbar clik right icon SSC Service Utility, choose Protection Counter -> clik reset protection counter -> choose Yes at pop up which is ask “Have you Replace waste ink pad”
5. Restart printer, and printer no blinks anymore.
Download software (v4.30)
Follow the steps above. I’ve tried myself. Good luck .
Download SSC Service Utility software. Click here to get the software.
The steps:
1. Make sure printer in the living conditions and are connected with a computer
(driver printer sudah terinstall)
2. Instal SSC Service Utility and run the program
3. Setting configuration printer model.Choose Epson Stylus Photo R230. then close the main window.

4.At the bottom right taskbar clik right icon SSC Service Utility, choose Protection Counter -> clik reset protection counter -> choose Yes at pop up which is ask “Have you Replace waste ink pad”
5. Restart printer, and printer no blinks anymore.
Download software (v4.30)
Follow the steps above. I’ve tried myself. Good luck .
Friday, May 17, 2013
resetter printer epson cx3900
Here this step to use resetter printer epson cx3900
- Switch on printer
- Set the computer date setting date to 23 january 2007
- Run adjprog.exe from the extracted folder
- Click accept
- Click particular adjustment mode
- Go to maintenance then Select waste ink pad counter then click ok
- Click on "check button" till its done then click on "initialization button" then click on "finish button"
- Switch off printer for 5secs then switch on again
- After you reset succesfully, you can change the date back to normal
Thursday, May 16, 2013
The Secret Resetter Code for Canon S450 Printer

1. Power off printer
2. Hold Resume button then press and hold POWER, the beeper will sound once.
3. Hold POWER and release RESUME
4. Press RESUME twice
5. Release Power button
6. When the indicator lights steady, press RESUME 3 times. The indicator should be orange.
7. Press Power to set data
The Secret Resetter Code for Canon BJC-2000 BJC-2100 Serie
1. Remove the Cartridge
2. Unplug the AC Power Cord
3. Close Front access panel
4. Hold down the RESUME/RESET button and plug in the AC power cord
5. Release RESUME/RESET after plugging in the AC Power cord.
6. Press the RESUME/RESET once within 5 seconds and release the RESUME/RESET.
7. Press and HOLD RESUME/RESET for two seconds or more and release it.
8. Press and HOLD RESUME/RESET for two seconds or more and release it.
9. Unplug AC Power Cord to set data.
Tuesday, May 14, 2013
Resetter Printer Epson CX7300

1. Switch on printer
2. Download Adjustment program Epson
2. Open auto.bat to set the date to 17 January 2006
3. Run adjprog.exe
4. Click accept
5. Click particular adjustment mode
6. Go to maintenance then Select waste ink pad counter then click ok
7. Click on "check button till its done then click on initialization button
then click on finish button
8. Switch off printer for 5 secs then switch on again
9. After you reset succesfully, you can change the date back to normal
Sunday, May 12, 2013
Epson Stylus C58 Color Inkjet Printer

Epson Stylus C58 Inkjet Printer Features
* On-demand Color Inkjet Printer
* Print speed
Black: 22 ppm (economy)
Color: 12 ppm (economy)
Photo: 85 seconds ( 4×6 / 10×5 - borderless)
* Max resolution (b&w) 5760 x 1440 dpi (with Variable-Sized Droplet Technology)
* Max resolution (color) 5760 x 1440 dpi (with Variable-Sized Droplet Technology)
* Paper Feed Method - Friction feed
* Paper Input capacity - 80 sheets, A4 Plain paper
* Max document size (print) - A4, A5, A6, B5, letter, half letter, legal, 4R, 5R, envelope, 132 x 220mm
* Black ink cartridge - Approx. 170 pages
* Color ink cartridge - Approx. 255 pages
* Interface - USB v2.0
* Input Data Buffer - 32 KB
* Compatible - Windows 98SE / ME / 2000 /XP/ XP, Mac OS 10.2+
* Dimensions - 435 (L) x 219 (D) x 165 mm (H)
* Weight - 2.8 kgs
C58 printer Blnking, would need Software Reset Blinking Printer EPSON Stylus C58 ... please downlod free. hopefully useful.
Download resetter Epson C58
Friday, May 10, 2013
Printer Epson Adjustment Program
Bagi anda yang belum mengetahui menggunakan adjustment program buat printer bisa anda baca selengkapnya disini
CARA PENGGUNAAN ADJUSTMENT PROGRAM
Rubah Regional And Language Option dan pada taskbar Regional Option Rubah Standards and Formats menjadi English (United States).
 Masukkan CD Adjustment Program For Epson.
Install Program “DATE CRACKER 2000” :
a) Buka Folder “CRACK”
b) Jalankan file SETUP
Setelah SETUP selesai, jalankan program “DATE CRACKER 2000”, maka akan tampil :
 Click tombol Add maka akan muncul tampilan seperti ini :
 Ketik nama Program, misalkan : Adjustment Program C-58, lalu tekan OK.
Click tombol Browse pada Program “DATE CRACKER 2000” seperti pada tampilan berikut : Maka akan tampak tampilan berikut :
Maka akan tampil icon Adjustment beserta dengan nama programnya
Pilih Icon tersebut dan tekan “Open”.
Kemudian lakukan pengisian tanggal validasi program, misalkan untuk C58 adalah tanggal 2 November 2006, lakukan pengisian MMM(spasi)D(spasi)YYYY. Jadi penulisannya adalah : Nov 2 2006, atau seperti tampak pada tampilan berikut : Arahkan Cursor ke Adjustment Program C-58, lalu tekan Run. Penggunaan selanjutnya langsung dapat langsung membuka program “Date Cracker”.
type Epson C58 setting tanggal Nov 2 2006
Epson C79 Setting tanggal Nov 2 2006
Epson C90 Setting tanggal Jul 24 2007
Epson CX2800 Setting tanggal Nov 2 2006
Epson CX3900 Setting tanggal Nov 2 2006
Epson CX5900 Setting tanggal Nov 2 2006
Epson R270 Setting tanggal Jan 18 2007
Epson R350 Setting tanggal Feb 1 2007
Epson C67 Setting tanggal Mar 1 2006
Epson C87 Setting tanggal Mar 1 2006
Epson R300,R310 Set tgl Mar 1 2006
Epson RX700 Setting tanggal Mar 1 2006
Epson C63-C64 Setting tanggal Mar 1 2006
Epson C41-C46 Setting tanggal Mar 1 2006
APA BILA MENEMUKAN PESAN ERROR MENJALANKAN ADJUSMENT
 Delete the folder - C:/Adjustment Programs/ on your PC.
Delete list Adjusment di program Data Cracker 2000
Dan jalankan program kemali sperti prosedur diatas,
 TAMPILAN MUKA APLIKASI
 ——Select Maintenance Option———
HEAD CLEANING
 WASTE INK PAD COUNTER
 KLIK CHECK
LALU KLICK INITIALIZATION
LALU TURN OFF/RESTART PRINTER ANDA,,
>> Silakan Mencobah
CARA PENGGUNAAN ADJUSTMENT PROGRAM
Rubah Regional And Language Option dan pada taskbar Regional Option Rubah Standards and Formats menjadi English (United States).
 Masukkan CD Adjustment Program For Epson.
Install Program “DATE CRACKER 2000” :
a) Buka Folder “CRACK”
b) Jalankan file SETUP
Setelah SETUP selesai, jalankan program “DATE CRACKER 2000”, maka akan tampil :
 Click tombol Add maka akan muncul tampilan seperti ini :
 Ketik nama Program, misalkan : Adjustment Program C-58, lalu tekan OK.
Click tombol Browse pada Program “DATE CRACKER 2000” seperti pada tampilan berikut :
 Maka akan tampak tampilan berikut :
Maka akan tampil icon Adjustment beserta dengan nama programnya
Pilih Icon tersebut dan tekan “Open”.
Kemudian lakukan pengisian tanggal validasi program, misalkan untuk C58 adalah tanggal 2 November 2006, lakukan pengisian MMM(spasi)D(spasi)YYYY. Jadi penulisannya adalah : Nov 2 2006, atau seperti tampak pada tampilan berikut :
 Arahkan Cursor ke Adjustment Program C-58, lalu tekan Run. Penggunaan selanjutnya langsung dapat langsung membuka program “Date Cracker”.
type Epson C58 setting tanggal Nov 2 2006
Epson C79 Setting tanggal Nov 2 2006
Epson C90 Setting tanggal Jul 24 2007
Epson CX2800 Setting tanggal Nov 2 2006
Epson CX3900 Setting tanggal Nov 2 2006
Epson CX5900 Setting tanggal Nov 2 2006
Epson R270 Setting tanggal Jan 18 2007
Epson R350 Setting tanggal Feb 1 2007
Epson C67 Setting tanggal Mar 1 2006
Epson C87 Setting tanggal Mar 1 2006
Epson R300,R310 Set tgl Mar 1 2006
Epson RX700 Setting tanggal Mar 1 2006
Epson C63-C64 Setting tanggal Mar 1 2006
Epson C41-C46 Setting tanggal Mar 1 2006
APA BILA MENEMUKAN PESAN ERROR MENJALANKAN ADJUSMENT
 Delete the folder - C:/Adjustment Programs/ on your PC.
Delete list Adjusment di program Data Cracker 2000
Dan jalankan program kemali sperti prosedur diatas,
 TAMPILAN MUKA APLIKASI
 ——Select Maintenance Option———
HEAD CLEANING
 WASTE INK PAD COUNTER
 KLIK CHECK
LALU KLICK INITIALIZATION
LALU TURN OFF/RESTART PRINTER ANDA,,
>> Silakan Mencobah
Subscribe to:
Posts (Atom)